Monday, November 21, 2022

A Taste of Thanksgiving {Recipe: Turkey and Stuffing Meatloaf}

This post is for those who aren't able to have a traditional Thanksgiving dinner, but still want the flavors of a Thanksgiving meal. Just add cranberry sauce and pumpkin pie (or other favorite Thanksgiving sides) along with this meatloaf and you have a little taste of Thanksgiving dinner. 

Turkey and Stuffing Meatloaf

Serve this with desired sides, such as cranberry sauce, mashed potatoes, corn and/or green beans. 

1-16 ounce package ground turkey
2 cups herb stuffing mix
1-14.5 ounce can of turkey or chicken broth, divided
1/2 cup diced onion
1/4 cup diced celery
1 tablespoon butter
2 eggs
1/2 teaspoon ground sage
1/2 teaspoon thyme
1/2 teaspoon garlic powder
1/2 teaspoon salt
1/4 teaspoon pepper

Preheat oven to 350ºF. Coat an 8.5x4.5" loaf pan with cooking spray. Place ground turkey into a medium mixing bowl; set aside. In a small mixing bowl, stir together 1-1/2 cups stuffing mix and broth: set aside to let the stuffing mix soften. . Melt butter in a small sauté pan, add onion and celery and sauté until onion is translucent and celery is softened. Remove onion mixture from heat. Crush or grind the remaining 1/2 cup stuffing mix by blender or hand, then add to onion mixture. Add eggs, sage, thyme, garlic powder, salt, and pepper to ground turkey, and stir with a fork. Add stuffing/broth mixture and onion/stuffing mixture; stir until well combined. Turn turkey mixture into prepared loaf and spread evenly into pan. Bake for 45-50 minutes, until an instant read thermometer inserted into the center of the meatloaf reaches an internal temperature of 165ºF. Let the meatloaf rest 10 minutes before serving. 

For Gravy:

2 tablespoons butter
1 tablespoon flour
Remaining 1/2 can of turkey or chicken broth 
1/2 teaspoon onion powder
1/4 teaspoon thyme
1/4 teaspoon salt, or to taste

Melt butter in a small saucepan over medium heat. Whisk in flour and cook for about a minute. Gradually add broth to the butter/flour mixture. Whisk in onion powder, thyme, and salt. Continue to cook until gravy thickens a bit. If gravy is too thick, add a little water until desired consistency is achieved. 

Serves 4

Enjoy!

Sunday, November 13, 2022

It's Apple Cider Season! {Recipe: Small Batch Apple Cider Pancakes}


After making some apple cider donut muffins recently, I thought that the flavor would make a good pancake flavor. I think I'm right, these are excellent!

Small Batch Apple Cider Pancake

This recipe can easily be doubled.

In a small mixing bowl stir together, then set aside:
1 cups of whole milk Greek yogurt (32 ounces)
1/2 teaspoon baking soda

In a medium mixing bowl whisk together:

1 cups all purpose flour
1 tablespoon sugar
1 teaspoons baking powder
1 teaspoon cinnamon 
1/4 teaspoon ginger
1/4 teaspoon nutmeg
Pinch of allspice
Pinch of teaspoon salt

In a small mixing bowl, whisk together:

1 large eggs
1 teaspoon vanilla
1/2 cup apple cider


Stir the egg mixture in with the yogurt mixture. Then pour this mixture into the medium bowl with the dry ingredients. Stir until just moistened and combined. It is important not to over stir pancakes. If the pancake batter gets overworked, the pancakes will be tough. 


Spray griddle with cooking spray or coat with a thin layer of oil, then heat on medium heat until the griddle is nice and hot. Using a 1/4 cup scoop or ice cream scoop, scoop and pour batter onto the hot griddle.* 

Turn the pancakes over when bubbles form on top; cook until the second side is golden brown.  Serve with butter and maple syrup.


Makes 8-10 pancakes.

*Note: This batter is a bit thick. After scooping the batter onto the griddle, they may need to be spread out a bit with a metal icing spatula or the back of the scoop to get desired thickness. Also, if preferred, more apple cider can be added to the pancake batter to thin it out. 

Enjoy!

Sunday, October 30, 2022

Trick or Treat Not too Sweet {Recipe: Savory Sablés}


These are great for taking a break from all of the sweets this time of year!

Savory Sablés

These are delicious on their own or would make a great addition to a cheese board.

1/2 cup butter, chilled and cubed
1-1/2 cups flour
1 tablespoon fresh thyme leaves or 1 teaspoon dried thyme
Pinch of cayenne pepper (or to taste)
Pinch of salt (not too much, the cheese is salty)
4 ounces or 1 cup of shredded extra sharp white cheddar cheese
4 ounces or 1 cup of shredded extra sharp cheddar cheese*
Flaky sea salt, optional**


This is not a Tillamook ad, we are just fans.

Place all of the ingredients into the bowl of a food processor and blend until a clumpy dough is formed, being careful not to over blend or overwork the dough. Over worked dough can result in a tough sablé. 


Turn the dough out onto a work surface and divide in half. Form each half into 10-inch logs about 1-1/4 inch in diameter. Wrap the logs in plastic wrap and refrigerate a minimum of 3 hours to overnight. 


To bake, preheat oven to 350ºF and line a baking sheet with parchment or silicone baking mat. Remove the dough logs from the refrigerator, remove plastic wrap, and slice logs into 1/4 inch slices. Place onto prepared baking sheets about 1 inch apart. Bake for 10 minutes, rotate the pan, and continue baking another 10 minutes or until golden brown. 

Makes 4 1/2-5 dozen sablés.

*All of one or the other cheeses can be used, it is just a color preference. 
**As mentioned above, the cheese is salty. So if using the flaky salt, use it sparingly. 

Enjoy!

Sunday, September 11, 2022

Taking Requests {Recipe: Korean Restaurant Style Macaroni Salad}


My son requested a recipe for macaroni salad like he gets from Korean restaurants. I'm not sure how traditional macaroni salad in Korean cuisine, but we see it at Korean restaurants often and it does go really well with Korean barbecue! This is what we came up with and it would go well with just about any barbecue. 

Korean Restaurant Style Macaroni Salad

I tried to keep the measurements simple so the recipe can easily be remembered and made without the recipe handy. It certainly can be adjusted to one's tastes. 

1 16 ounce package large elbow macaroni
1 cup Japanese or regular mayonnaise 
2 teaspoons fresh squeezed lemon juice 
2 teaspoon honey
1 teaspoon Dijon mustard
1 teaspoon salt
1/4 teaspoon finely ground white pepper
1/4 teaspoon onion powder
1 cup each of the following in any combination:
  • red onion, chopped
  • cucumber
  • yellow, red, orange. and/or green peppers, chopped
  • Granny Smith apple, chopped
  • frozen corn, thawed, rinsed, and dried on a paper towel
  • hard boiled eggs (about 3), chopped
Cook macaroni following the package directions; drain, rinse, place in a large mixing bowl, then place the bowl in the refrigerator to cool while preparing the remaining ingredients. Prepare all of the additions using and add to the bowl with the macaroni (for salad shown, red onion, cucumber, yellow pepper, and apple was used). In a a small mixing bowl, whisk together mayonnaise, lemon juice, honey, mustard, salt, white pepper, and onion powder; taste for seasoning and adjust accordingly. Add mayonnaise mixture to macaroni mixture and stir together until well combined. Chill in the refrigerator for 30 minutes before serving. 

Serves 12

Enjoy!

Saturday, August 13, 2022

Dessert Pour Deux {Recipe: French Toast With Ice Cream and Caramel Sauce )


On a recent trip to France my daughter and I shared a French toast dessert with caramel sauce and ice cream and thought it was the best dessert ever! It is so simple and so delicious. Also, it is the perfect desert to make for just 2, but the recipe can easily be adjusted to serve more. 

French Toast With Ice Cream and Caramel Sauce

2 slices of brioche bread 
1 egg
2 tablespoons milk
1/4 teaspoon vanilla
Pinch of salt
1 tablespoons butter
Vanilla ice cream, homemade (see below) or store bought
Caramel Sauce*  

In a shallow bowl (I use a pie pan), whisk together egg, milk, vanilla, and salt. Place butter a skillet big enough to fit 2 slices of bread and pre-heat over medium-low setting. Dip the brioche bread into the egg mixture, soaking both sides. Transfer bread to the pre-heated skillet and cook until golden brown on both sides. Serve immediately topped with a scoop of ice cream and drizzled with caramel sauce. 

*Use your favorite store bought caramel sauce to keep it simple.

Vanilla Ice Cream

This recipe is from the Cuisinart booklet that came with our Flavor Duo ™Frozen Yogurt-Ice Cream & Sorbet Maker. It would work well with any one quart electric ice cream maker. 

3/4 cup milk, well chilled
2/3 cup granulated sugar
1-1/2 cups heavy cream, well chilled
1 teaspoon pure vanilla extract, to taste*

In a medium bowl, use a hand mixer or a whisk to combine the milk and granulated sugar until the sugar is dissolved, about 1 to 2 minutes on low speed. Stir in the heavy cream and vanilla to taste. Turn the machine ON, pour the mixture into the freezer bowl of the ice cream maker, and let mix until thickened, about 20 to 25 minutes. The ice cream will have a soft creamy texture. If desired, transfer the ice cream to an airtight container and place in freezer until firm, about 2 hours. (Freezing ice cream until firm is what a recipe means if it say to "ripen" ice cream).

*Vanilla bean can be substituted for the vanilla extract. Just add vanilla bean caviar that is scraped out of one whole vanilla been instead of the vanilla extract. 

Saturday, June 25, 2022

Lighten Up! {Recipes: Lightened Up Alfredo Sauce and Pizza Crust}


As much as I love traditional Alfredo sauce, it can be very heavy and rich. This lightened up version of Alfredo sauce is a recipe I have been making for years, but only recently started using it on homemade pizzas. Inspired by the white pizza from one of our local pizzerias, I came up with my own version. This is one of the best pizzas I have ever made!

Lightened Up Alfredo Sauce

2 tablespoons olive oil
2 tablespoons butter
2-3 cloves of garlic, minced
2 tablespoons flour
1 cup vegetable or chicken broth
1 cup milk
1/2 cup Parmesan cheese, finely grated
1/2 teaspoon salt, or to taste
1/4 teaspoon freshly ground pepper, or to taste

Heat olive oil and butter in a large sauté pan over medium high heat, add garlic and sauté until garlic is fragrant (about 30 seconds, overcooking can lead to a bitter garlic taste). Whisk in flour and continue to cook another minute. Slowly whisk in broth and milk; simmer, stir occasionally, until sauce has thickened. Add Parmesan cheese, salt and pepper and continue to simmer until cheese is melted; check seasoning and adjust accordingly. 

Serves 4

Serving suggestions:

1. Lightened Up Fettuccine Alfredo. Add 12 ounces of pasta, cooked according to package directions, to sauce; serve immediately. Cooked chicken, cut into strips, can be added as well for Chicken Fettuccine Alfredo. 

2. White sauce for pizza.


Use in place of a tomato sauce on pizza. For pizza pictured, the sourdough pizza crust was used from https://www.kingarthurbaking.com/recipes/sourdough-pizza-crust-recipe with 1/2 teaspoon Italian seasoning and 1/4 teaspoon minced garlic added, then topped with vegetarian Italian sausage on 1/3 for my vegetarian daughter, regular Italian sausage on the rest (both were precooked and crumbled), 1-2 cups shredded mozzarella cheese, fresh baby spinach leaves, chopped red onion, mushroom slices, grape tomato halves, and a sprinkling of finely grated Parmesan cheese, freshly ground pepper and Italian seasoning. The following recipe for pizza crust from this site would work as well. 

Pizza Crust

Ingredients

1 cup warm water

1/2 tablespoon active dry yeast
1/2 teaspoon salt
2-1/2 cups flour. divided
2 tablespoons olive oil, divided
1/2 teaspoon Italian seasoning, optional
1/4 teaspoon dried minced garlic, optional

Instructions:


1. Mix warm water and yeast and let sit 5 minutes until yeast proofs. 

2. Add 1-1/4 cups flour with proofed yeast and mix well in mixer with dough attachment or hook.
3 Add remaining 1-1/4 cups flour and salt (also the Italian seasoning and dried minced garlic, if using) knead until smooth. Form dough into a ball and place in a large mixing greased with olive oil. Cover bowl with plastic wrap and let rest for about 90 minutes or until puffed up. 
4. Using a pizza peel or a large pan with no rim (I use a cookie sheet that has no rim on one side and it works well), place parchment paper cut into approximately a 16" round onto the peel; brush with one tablespoon of olive oil.  
Alternatively, a rectangular baking sheet can be used. To prepare the baking sheet, coat bottom with one tablespoon of olive oil.
5. Place dough in the center of the prepared pizza peel or baking sheet. Press dough out with your fingertips toward the edge of the parchment  or baking sheet to form a nice round or rectangular pizza crust. If dough shrinks back too much while trying to shape, cover and let rest for 15 minute and try again. Brush the top of the dough with the other tablespoon of olive oil. Cover with tea towel and let rest while oven heats up. 
6. Preheat oven to 450°F. for 15-30 minutes with pizza stone or steel in the oven, if using. 
7. Top pizza with sauce and bake for 5 minutes. Remove from oven and add the rest of the toppings using. Bake another 10-15 minutes, or until toppings are nicely browned. Keep a careful eye on the crust, the oven is very hot, so the dough can burn quickly. 


Enjoy!

Friday, June 17, 2022

Keep It Simple {Recipe: Easy Eton Mess for Two}


It's strawberry season and lately the strawberries I've been purchasing are so good! So, I wanted to make a simple dessert that highlighted the flavor of the strawberries and I wanted it to be lighter than strawberry shortcake. The first dessert to pop in my head to accomplish this is Eton Mess. This is a simple version of the classic British dessert to serve 2, but can easily be adjusted to serve more. 

Easy Eton Mess for Two

For Meringue Cookies:

1 egg white, at room temperature
1/4 teaspoon cream of tartar
1/3 cup superfine sugar (regular granulated sugar will work)
pinch of salt
1/2 teaspoon vanilla

Preheat oven to 225ºF.  Line a baking sheet with parchment paper; set aside. Place egg white in the bowl of a stand mixer* and beat egg white and cream of tartar on high until frothy. Slowly add sugar, about one tablespoon at a time, with the mixer running; add pinch of salt and vanilla. Continue to beat until glossy and stiff peaks are formed. Drop by tablespoonful onto the prepared baking sheet. Bake for 45 minutes, then turn oven off. Without opening the oven door, leave in the oven for an additional hour. Remove from oven and cool to room temperature. Store in an airtight container for up to 2 weeks in a cool dry place or in the freezer for a couple of months. 

Yields 6-8 cookies. 

*Note: a regular mixer can be used, although it is just easier to add the sugar slowly using a stand mixer.

Because the meringue cookies will be crumbled, there is no need to make them look pretty. 


For Eton mess:

4-6 meringue cookies
1 pint strawberries
1 teaspoon to 1 tablespoon superfine or regular granulated sugar, depending on sweetness of strawberries and taste.
1 container whipped topping, thawed*

Crumble or chop meringue cookies into small pieces; set aside. Chop strawberries, place in a medium mixing bowl and stir in sugar until dissolved.  In two dessert cups, layer ingredients starting with whipped topping, then meringue cookie crumbles, and top with strawberry mixture; repeat. 

2-4 Eton Mess desserts can be made, depending on size of desserts desired. 

*Not an ad, just a fan.
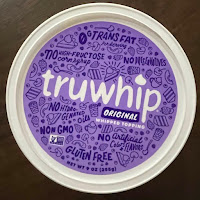
Note: I use Truwhip topping because it can be refrozen after thawing. Fresh whipping cream is traditionally used, but I find for just 2 servings the rest of the whipped cream goes to waste. With the frozen whipped topping, I can thaw it, use what I need, then refreeze. Also, a bit of vanilla ice cream layered in is a delicious addition to this dessert. If using, start with ice cream, then whipped topping, meringue crumbles, and top with prepared strawberries. 

Enjoy!

Friday, June 10, 2022

Not Your Typical Kids' Summer Camp Meal! {Recipe: Garlic Herb Butter Steak and Potato Foil Packs}


These are not the summer camp foil packs I had as a kid! This is a fancier version this classic camping meal or a nice summer meal at home without heating the kitchen up too much. 

Garlic Herb Butter Steak and Potato Foil Packs

4-8 Yukon gold potatoes (about a pound, depending on size), parboiled*
2 pounds top sirloin steak, cut into 2 inch cubes
1 bunch asparagus, rinsed, trimmed, and cut into about 2 inch pieces
1/2 onion, yellow or red, sliced
2-3 cloves (depending on size) of garlic, mined 
2 tablespoons olive oil
1 teaspoon rosemary
1/2 teaspoon thyme
1 teaspoon salt
1/4 teaspoon pepper
2 tablespoons butter
Dried parsley, optional

Parboil potatoes (see below), cool to room temperature and place them in a large mixing bowl, along with the steak, asparagus, onion, garlic, rosemary, thyme, salt, and pepper. Drizzle with the olive oil, then toss it all together until everything is well coated with herbs, garlic, and oil.  Take 4-12"x15"pieces of foil and distribute the steak potato mix evenly among the pieces of foil, place a 1/2 tablespoon pat of butter on top of each one. Sprinkle with parsley, if desired.  


Fold the foil tightly around the filling, starting with long sides brought together and folded over a few times, then fold in the end a few times. 


To grill: Preheat grill on high. Once grill is heated, place foil packs on grill and grill for 10 minutes. Flip the packs and cook another 8-10 minutes. Open one pack and test one of the steak pieces with an instant read thermometer. Temperature should be between 130ºF for medium rare to 140ºF for medium. 

The foil packs can be enjoyed as is, or after open them up, place them under a broiler for a few minutes to get a nice browning on the steak and potatoes. 

*Potatoes take a much longer time to cook than the rest of the ingredients, therefore it is best to parboil them. To do this, clean and cube potatoes into 1 inch pieces, place into a stockpot or large saucepan and cover with water to about an inch or so above the potatoes; add a pinch of salt and cover with a lid. Heat potatoes over high heat until water comes to a boil, reduce heat to medium high and continue to boil 5-10 minutes. Test the potatoes doneness by inserting a fork or sharp knife. If they go in to the potato with only a slight resistance, the potatoes are done. Drain the potatoes and cool to room temperature. Below is a link to very good, step by step instructions for parboiling potatoes, other uses for them, and how to store them:

Enjoy!


Friday, June 3, 2022

Old Hollywood Style {Recipe: Build Your Own Wedge Salad With Homemade Ranch Dressing}

Wedge salads are so simple to make, yet still seem elegant to serve. Maybe it's because I associate this salad with the old Hollywood restaurant, Musso & Frank Grill, it seems fancy to me. Recently I hosted a book club meeting and set up a "build your own" wedge salad bar-it worked out great and was so easy! This way everyone could top their salads however they wished. I served Homemade Ranch Dressing rather than bleu cheese, because I find not everyone cares for bleu cheese. 

Homemade Ranch Dressing

1/4 cup mayonnaise 
1/2 cup buttermilk
1/2 cup sour cream
1 teaspoon dried chives
1 teaspoon dried parsley 
1/2 teaspoon garlic powder
1/2 teaspoon onion powder
1/2 teaspoon salt
1/4 teaspoon pepper
1/4 dried dill 
2 teaspoon fresh squeezed lemon juice

Place all ingredients in a blender and blend until well combined. Store dressing in a pint size jar in the fridge. 

Build Your Own Wedge Salad

For wedge salad, cut a whole head of iceberg lettuce in half, then in quarters (can be cut in eighths for a small wedge side salad). Trim off the remaining stem or solid core at the bottom of the wedges. Arrange the wedges on a platter and serve with tongs. 

To build the salad, place wedge on a plate with center edge facing up and spoon or pour dressing over it, then sprinkle whatever combination of topping you like! 

Suggested toppings for wedge salad:

Hard boiled egg, halved or crumbled
Bleu cheese crumbles
Bacon, chopped or crumbled
Grape tomato, halved
Red onion, chopped
Fresh chives, chopped
Crispy onions
Croutons, Trader Joe's Rosemary Croissant Croutons are our favorite. 
Fresh ground pepper

Enjoy!


Sunday, May 22, 2022

They Belong Together Like PB&J {Recipe: Peanut Butter Surprise Muffins}


This is a twist to a recipe I used to make as a kid from one of my first cookbooks, Betty Crocker's Cookbook. The recipe is a suggested variation of the traditional muffin recipe in the book called "Surprise Muffins" and are filled with jam or jelly. I am surprised it took me this long to think of making a PB&J version of these muffins, I mean, what goes better together?

Peanut Butter Surprise Muffins

Preheat oven to 400ºF. Spray 8 wells of a muffin tin with non-stick cooking spray; set aside.

In a medium mixing bowl, whisk together:

1/2 cup brown sugar
1/3 cup natural peanut butter
1/2 cup milk
2 tablespoons oil
1 egg
1 teaspoon vanilla


In another mixing bowl, whisk together:

1-1/2 cups all purpose flour
2 teaspoons baking powder
1/4 teaspoon salt

Filling for muffins:

3 tablespoons jam or jelly


Pour peanut butter mixture into the flour mixture and stir until just combined, being careful not to over stir. The mixture will be thick. Fill the prepared wells of muffin tin about 1/2 way. Create a small indentation in the center of the batter with a small spoon or fingertip (dampen spoon or fingertip with water, if needed, the batter is sticky). Fill each dip with a teaspoon of jam or jelly. Distribute the remaining of the batter to cover the jam or jelly. Bake muffins for about 15-20 minutes, or until nice and golden brown and a toothpick inserted in the center of one comes out clean.  

Yields 8 muffins

Enjoy!

Monday, May 2, 2022

Mom's Make Things Look Easy! {Recipe: Small Batch Swedish Pancakes)


This Swedish Pancake recipe is from my mother's old recipe box. These pancakes were a favorite of my father's and I still remember my mother making them for him; she made it look so easy! I found them a little challenging, but maybe I just need more practice. 

Small Batch Swedish Pancakes

1-1/2 cups milk
2 large eggs
1/2 cup + 2 tablespoons flour, sifted
1 tablespoon sugar
pinch of salt (about 1/8 teaspoon)

Place all ingredients into a blender and blend until smooth, about 1 minute. Let batter stand for 2 hours, then give a quick pulse of the batter just before cooking. Heat a medium size nonstick sauté pan over medium heat, brush pan with clarified butter* pour about 1/2 cup batter into heated pan and cook on both sides until nicely browned. 

Note: It is bit of a challenge to flip these. My mom made it look effortless, but I had a bit of trouble. I came up with 2 solutions: 1. I loosened the pancake with one spatula and slid it under one side of the pancake, then used a second spatula on the other side and flipped. This took a bit of coordination, but it worked. 2. I cooked the pancake until it was lightly browned on one side and looked dry on the other. Then I folded the pancake in half, let it cook until nicely browned on one side, flipped it, and nicely browned it on the other side. Then folded the pancake in half again (finished pancake is pictured below).


Topping suggestions:
Butter
Jam
Sour Cream
Berry syrup
Maple syrup
Nutella
Fresh berries
Lemon curd
 
Some good topping combinations:
Butter and Jam
Maple syrup and melted butter
Sour cream, jam, or berry syrup
A squeeze of lemon juice, a sprinkle of granulated sugar, and fresh blueberries

*Clarified is readily available these days at Trader Joe's and many grocery stores, but if you do not have it, cooking oil should work fine. 

Enjoy!

Saturday, February 5, 2022

For the Love of Rustic Food {Recipe: Vegetable Tian Galette}


After making my first apple galette a few months ago, I wanted to try my hand at making a savory one. I thought the layering of vegetables for a tian would work well for a galette, I think I was right! So, this is essentially vegetable tian with the addition of pie crust and Boursin Cheese.

Vegetable Tian Galette

1 pie crust dough, my favorite is a Sourdough Pie Crust that can be found here: https://littlespoonfarm.com/sourdough-pie-crust-recipe/

1-5.2 ounce container of Boursin Garlic & Fine Herb Cheese, or        spreadable goat cheese. 
1 medium onion, diced
2 cloves of garlic, minced
2 tablespoon of olive oil, divided
1 1/2 teaspoons fresh thyme leaves,  plus a few sprigs for the top
1 each zucchini and yellow squash
2 Roma tomatoes
2-4 Yukon Gold potatoes, depending on size
1 egg, beaten
1/4 cup grated Gruyère cheese
Salt and fresh ground pepper

1. Preheat oven to 375ºF.  Line a baking sheet with parchment paper; set aside.

2. Prep the vegetables by slicing them as thinly as possible (about 3/8-inch). The skin on the potatoes can be left on or peeled off, depending on your preference. In a medium sauté pan, heat one tablespoon of olive oil, add the onion and sauté until translucent. Add the garlic and sauté until the garlic just becomes fragrant; remove from heat. 

3. Roll out pie crust dough into a circle about 1/4 inch thick. Do not worry about rough edges, galettes are supposed to be rustic. Carefully pick up the pie crust and place it in the center of the parchment paper on the prepared baking sheet. 

4. Take about 3/4 of the package of Boursin Cheese (the whole package can be used, if you like), place it in a microwave safe bowl and microwave it for about 10-15 seconds. This makes it a little easier to work with. Spread the Boursin Cheese onto the center of the prepared pie crust dough, leaving about a 3 inch border around the edge. 

5. Spoon the prepared onion/garlic mixture over the Boursin Cheese, then sprinkle with the fresh thyme leaves. Layer the sliced vegetables in a circular pattern over the onion/garlic mixture, starting with the outer edge of the Boursin Cheese and working towards the center. 

6. Carefully fold the edges of the pie crust dough towards the center of the circle, overlapping the dough as needed and leaving the center exposed. Brush the top of the vegetables with one tablespoon olive oil, then refrigerate the galette for 10 minutes. 

7. Remove galette from the refrigerator, brush the dough edges with beaten egg, and sprinkle top with salt and fresh ground pepper.

8. Bake galette for 25 minutes. Remove the galette from oven and sprinkle the top of the vegetables with Gruyère cheese and place the thyme sprigs on top. Return to oven and bake another 15 minute, or until the potatoes are tender. 

9. Remove from oven and let stand for 5-10 minutes before serving. 

Enjoy!


Monday, January 17, 2022

It's Just Not the Same {Recipe: Sweet Potato, Gruyère, and Thyme Scones}


These are an attempt to make a copy cat scone that we tried from Tartine Bakery in San Francisco. They did not turn out like the Tartine ones, but they are delicious all the same. 

Sweet Potato, Gruyère, and Thyme Scones

2 cups flour
1 tablespoons sugar
1 tablespoon baking powder
1/2 teaspoon salt
6 tablespoons butter, cold 
1/2 cup grated Gruyère cheese
1 tablespoon fresh thyme, finely chopped
1/2 cup roasted sweet potato, smashed
1 egg (plus one egg for brushing on top of scones before baking)
1/2 cup buttermilk
1 tablespoon finely grated Parmesan cheese

1. Preheat oven to 425ºF. Line a baking sheet with a silicone baking mat or parchment; set aside. 

2. Sift together flour, sugar, baking powder, and salt. Cut butter into about 1/2 inch pieces, then add to flour mixture. Using a pastry blender or 2 knives, cut butter into flour mixture until resembles coarse crumbs. Stir in Gruyère cheese and thyme with a fork until well distributed; set aside. In a small mixing bowl, whisk together sweet potato, egg and buttermilk until well combined. Stir sweet potato mixture into the flour mixture with a fork just until the dough comes together. Be careful not to over mix. Turn dough out on a lightly floured surface and knead gently 15 times. 

3. Shape dough into a ball. Pat or roll the ball out into a circle 1/2-inch thick. Cut into eight wedges. Place on baking sheet, brush lightly with lightly beaten egg and sprinkle with Parmesan cheese, if using . Bake for 10-15 minutes, or until golden brown. 

Yields 8 scones

Enjoy!
Print Friendly and PDF